No edit summary |
No edit summary |
||
| (25 intermediate revisions by 6 users not shown) | |||
| Line 1: | Line 1: | ||
{{Project | {{Project | ||
|Name=Spaceprinter | |||
|Status=Operational | |||
|Niche=Mechanics | |||
|Purpose=Infrastructure | |||
|Picture=3dprinter.jpg | |||
|Tool=Yes | |||
|Location=Printer-desktop | |||
|Category=Fabrication | |||
|ProjectParticipants=buZz niz | |ProjectParticipants=buZz niz | ||
}} | }} | ||
{{Hot surface|}} | |||
== What == | == What == | ||
| Line 11: | Line 17: | ||
* https://wiki.bitlair.nl/index.php?title=3D_Printer_Workshop | * https://wiki.bitlair.nl/index.php?title=3D_Printer_Workshop | ||
== How == | |||
A manual for printing can be found [[3D_printer_manual|here]]. | |||
== Want == | == Want == | ||
| Line 21: | Line 30: | ||
* Greg's Hinged Accessible Extruder http://www.thingiverse.com/thing:8252 | * Greg's Hinged Accessible Extruder http://www.thingiverse.com/thing:8252 | ||
* Arcol's v4 hotend http://wiki.arcol.hu/arcol-hu-hot-end-v4-assembly | * Arcol's v4 hotend http://wiki.arcol.hu/arcol-hu-hot-end-v4-assembly | ||
* http://nurdspace.tk/~buzz/Spaceprinter_Marlin_Configuration/ | |||
==== Electronics ==== | ==== Electronics ==== | ||
| Line 43: | Line 54: | ||
* e steps http://www.wolframalpha.com/input/?i=%28200+*+%28%281%2F16%29%5E-1%29+*+%2843%2F10%29%29%2F%28pi*5.9%29 | * e steps http://www.wolframalpha.com/input/?i=%28200+*+%28%281%2F16%29%5E-1%29+*+%2843%2F10%29%29%2F%28pi*5.9%29 | ||
== | == Building process == | ||
Result of day 1 : http://www.flickr.com/photos/complete_bastiaan/6819602063/ built the frame and the y axis | Result of day 1 : http://www.flickr.com/photos/complete_bastiaan/6819602063/ built the frame and the y axis | ||
| Line 70: | Line 81: | ||
* http://blog.reprap.org/2011/11/prusa-iteration-2.html | * http://blog.reprap.org/2011/11/prusa-iteration-2.html | ||
== Upgrades == | |||
* Changing 8mm threaded rods for 5mm | |||
* New bearings | |||
* New smooth rods | |||
== Nice things to print == | == Nice things to print == | ||
| Line 95: | Line 110: | ||
* http://www.thingiverse.com/thing:17612 - PL1Q Vampire QuadCopter | * http://www.thingiverse.com/thing:17612 - PL1Q Vampire QuadCopter | ||
* http://www.thingiverse.com/thing:7038 - vervanging voor missende rits-trekker | * http://www.thingiverse.com/thing:7038 - vervanging voor missende rits-trekker | ||
Latest revision as of 21:11, 13 February 2017
| Spaceprinter | |
|---|---|
| Participants | User:buzz |
| Skills | |
| Status | Operational |
| Niche | Mechanics |
| Purpose | Infrastructure |
| Tool | Yes |
| Location | Printer-desktop |
| Cost | |
| Tool category | Fabrication |
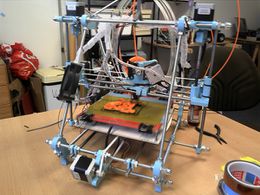
3dprinter.jpg {{#if:Yes | [[Tool Owner::buZz niz | }} {{#if:Yes | [[Tool Cost::{{{Cost}}} | }}

|
Hot surface
|
What
buZz and Niz are participating in bitlair's 3d printer workshop to build a Reprap Prusa Mendel v2 for the space gear.
How
A manual for printing can be found here.
Want
Specifics
- Prusa v2 plastics https://github.com/prusajr/PrusaMendel
- Greg's Hinged Accessible Extruder http://www.thingiverse.com/thing:8252
- Arcol's v4 hotend http://wiki.arcol.hu/arcol-hu-hot-end-v4-assembly
Electronics
- Arduino Mega 2560 http://arduino.cc
- RAMPS 1.3 http://reprap.org/wiki/RAMPS_1.3
- Polulu A4988 drivers http://www.pololu.com/catalog/product/1182
- Hotend thermistor ; epcos g550 (type 6)
Motor Specs
(From http://xyzprinters.com/electronics/89-stepper-motor.html)
Step Angle 1.8° ±5%
Torque: 5.0 kg.cm
Drive Shaft length: 24 mm
Shaft diameter: 5 mm
Wire length: 600 mm
Calibration
* e steps http://www.wolframalpha.com/input/?i=%28200+*+%28%281%2F16%29%5E-1%29+*+%2843%2F10%29%29%2F%28pi*5.9%29
Building process
Result of day 1 : http://www.flickr.com/photos/complete_bastiaan/6819602063/ built the frame and the y axis
Result of day 2 : http://www.flickr.com/photos/complete_bastiaan/6865284365/ built the z and x axis and started alignment and fine-tuning (more is still needed), also cemented the hot-end up
Some day later : http://www.flickr.com/photos/complete_bastiaan/6835564992/ _almost_ printed a flute :)
Added to our printer
- http://www.thingiverse.com/thing:10707 <- new gears for the extruder
- http://www.thingiverse.com/thing:19812 <- wingnuts for the extruder hinge
- http://www.thingiverse.com/thing:19142 <- new extruder hinge
- http://www.thingiverse.com/thing:7754 <- clips to mount fans
- http://www.thingiverse.com/thing:17912 <- ramps & arduino mount
- http://www.thingiverse.com/thing:19284 <- filament guide
- http://www.thingiverse.com/thing:15118 <- other carriage (with fanmount and turned belt, wooo)
- http://www.thingiverse.com/thing:21502 <- filament spool mount (not happy with this one, will change someday ..
Docs we followed
Upgrades
- Changing 8mm threaded rods for 5mm
- New bearings
- New smooth rods
Nice things to print
- http://www.thingiverse.com/thing:1183 - handboeien
- http://www.thingiverse.com/thing:10609 - sleutelhouderding
- http://www.thingiverse.com/thing:16286 - fluitje
- http://www.thingiverse.com/thing:16218 - kathedraal model
- http://www.thingiverse.com/thing:15113 - onderdelen doosje met deksel
- http://www.thingiverse.com/thing:16331 - T-Rex model :)
- http://www.thingiverse.com/thing:12616 - lijmklem
- http://www.thingiverse.com/thing:16104 - raspberry pi case :D
- http://www.thingiverse.com/thing:2964 - panfluit
- http://www.thingiverse.com/thing:16419 - piratebay schip
- http://www.thingiverse.com/thing:16754 - 2.5" -> 3.5" HDD mounting adapter
- http://www.thingiverse.com/thing:8991 - schedel kom (voor noodles? :) )
- http://www.thingiverse.com/thing:11423 - een werkend hangslot ( :OOOO )
- http://www.thingiverse.com/thing:16764 - arduino case
- http://www.thingiverse.com/thing:13616 - printbare raket voor 'B en C motoren'
- http://www.thingiverse.com/thing:14639 - ruimteschip model
- http://www.thingiverse.com/thing:1009 - tube leegknijper
- http://www.thingiverse.com/thing:11955 - printbare trebuchet :)
- http://www.thingiverse.com/thing:12223 - tablet standaard
- http://eclecti.cc/hardware/physical-keygen-duplicating-house-keys-on-a-3d-printer
- http://reprap.org/wiki/Tantillus - printer die een groot deel van zichzelf kan printen
- http://www.thingiverse.com/thing:17612 - PL1Q Vampire QuadCopter
- http://www.thingiverse.com/thing:7038 - vervanging voor missende rits-trekker
