Geodome: Difference between revisions
No edit summary |
No edit summary |
||
| Line 12: | Line 12: | ||
}} | }} | ||
=Construction of the pipe cleaner connectors= | =Construction of the pipe cleaner connectors= | ||
[[File:Pipe Cleaner Connector 1.jpg | [[File:Pipe Cleaner Connector 1.jpg|200x300px]] Start with two pipe cleaners, crossed in the middle. | ||
Start with two pipe cleaners, crossed in the middle. | [[File:Pipe Cleaner Connector 2.jpg|200x300px]] Fold them across each other. For a 4-way connector (blue hubs in the construction diagrams), do this again and stop here. | ||
[[File:Pipe Cleaner Connector 2.jpg | [[File:Pipe Cleaner Connector 3.jpg|200x300px]] Add a third pipe cleaner across the fold to form a crude hexagonal arrangement. For a 5-way connector, offset the lengths so one is shorter than the others. | ||
Fold them across each other. For a 4-way connector (blue hubs in the construction diagrams), do this again and stop here. | [[File:Pipe Cleaner Connector 4.jpg|200x300px]] Counting from the top clockwise, fold the first(2 o'clock) and fifth(10 o'clock) spokes around the sixth (12 o'clock). | ||
[[File:Pipe Cleaner Connector 3.jpg | [[File:Pipe Cleaner Connector 5.jpg|200x300px]] Do the same for the the second(4 o'clock) and fourth(7 o'clock) spokes around the fourth (6 o'clock). | ||
Add a third pipe cleaner across the fold to form a crude hexagonal arrangement. For a 5-way connector, offset the lengths so one is shorter than the others. | [[File:Pipe Cleaner Connector 6.jpg|200x300px]] Rotate the entire structure clockwise by one spoke. | ||
[[File:Pipe Cleaner Connector 4.jpg | [[File:Pipe Cleaner Connector 7.jpg|200x300px]] As above, fold the first(2 o'clock) and fifth(10 o'clock) spokes around the sixth (12 o'clock) in the opposite direction to before. | ||
Counting from the top clockwise, fold the first(2 o'clock) and fifth(10 o'clock) spokes around the sixth (12 o'clock). | [[File:Pipe Cleaner Connector 8.jpg|200x300px]] Finally, fold the second(4 o'clock) and fourth(7 o'clock) spokes around the fourth (6 o'clock) in reverse again to produce a 6-way connector (white hubs). For a 5-way connector (red hubs), loop the short end around the core and trim it short. | ||
[[File:Pipe Cleaner Connector 5.jpg | |||
Do the same for the the second(4 o'clock) and fourth(7 o'clock) spokes around the fourth (6 o'clock). | |||
[[File:Pipe Cleaner Connector 6.jpg | |||
Rotate the entire structure clockwise by one spoke. | |||
[[File:Pipe Cleaner Connector 7.jpg | |||
As above, fold the first(2 o'clock) and fifth(10 o'clock) spokes around the sixth (12 o'clock) in the opposite direction to before. | |||
[[File:Pipe Cleaner Connector 8.jpg | |||
Finally, fold the second(4 o'clock) and fourth(7 o'clock) spokes around the fourth (6 o'clock) in reverse again to produce a 6-way connector (white hubs). For a 5-way connector (red hubs), loop the short end around the core and trim it short. | |||
=Strut construction= | =Strut construction= | ||
| Line 39: | Line 31: | ||
* The dome only consists of two types of triangle - AAB and BCC. If you ever construct any that don't match these, something has gone wrong. | * The dome only consists of two types of triangle - AAB and BCC. If you ever construct any that don't match these, something has gone wrong. | ||
[[File:Dome Construction 1.jpg | [[File:Dome Construction 1.jpg|200x300px]] Start with a 5-way connector and put 5 C tubes around it. Tip these with 6-way connectors, and connect them with 5 B's to form five BCC triangles. | ||
Start with a 5-way connector and put 5 C tubes around it. Tip these with 6-way connectors, and connect them with 5 B's to form five BCC triangles. | [[File:Dome Construction 2.jpg|200x300px]] Add two A tubes to each of the outlying 6-ways leaving the last connection free. Connect these at the ends into five AAB triangles with more 6-way connectors. | ||
[[File:Dome Construction 2.jpg | [[File:Dome Construction 3.jpg|200x300px]] Fill up that last space with B tubes, and end those with 6-way connectors. Join all the outlying 6-way connectors up with more A tubes to make 10 more AAB triangles. | ||
Add two A tubes to each of the outlying 6-ways leaving the last connection free. Connect these at the ends into five AAB triangles with more 6-way connectors. | [[File:Dome Construction 4.jpg|200x300px]] Any 6-way with just A pipes to it, add two more A pipes. Any others, put two B pipes around it leaving the centre free. | ||
[[File:Dome Construction 3.jpg | [[File:Dome Construction 5.jpg|200x300px]] Make 5 more 5-way connectors with all the remaining C-tubes and put one joining to the remaining spaces where the B-tubes join. Then use more 6-way connectors to join up the next outer pair and form 10 more AAB and 10 BCC triangles. | ||
Fill up that last space with B tubes, and end those with 6-way connectors. Join all the outlying 6-way connectors up with more A tubes to make 10 more AAB triangles. | [[File:Dome Construction 6.jpg|200x300px]] Connect the new 6-way connectors from above with a B-pipe. This will lift the dome a lot. | ||
[[File:Dome Construction 4.jpg | [[File:Dome Construction 7.jpg|200x300px]] Fill up the remaining spaces on the 6-way connectors with only A's and B's by making sure that a B-pipe is never next to another B-pipe. | ||
Any 6-way with just A pipes to it, add two more A pipes. Any others, put two B pipes around it leaving the centre free. | [[File:Dome Construction 8.jpg|200x300px]] Join the ends of the new B's and C's with 4-way connectors, and A's and A's with 4-way connectors, forming 5 AAB and 10 BCC trinalges. | ||
[[File:Dome Construction 5.jpg | [[File:Dome Construction 9.jpg|200x300px]] Join the remaining spaces up, connecting two BCC triangles with a B-pipe, and everything else with an A-pipe in an A-A-B pattern as you go around. Initially this will put a lot of stress on the freskly made joints, so on large scale make sure you have someone to help lift the dome with you as you complete. | ||
Make 5 more 5-way connectors with all the remaining C-tubes and put one joining to the remaining spaces where the B-tubes join. Then use more 6-way connectors to join up the next outer pair and form 10 more AAB and 10 BCC triangles. | |||
[[File:Dome Construction 6.jpg | |||
Connect the new 6-way connectors from above with a B-pipe. This will lift the dome a lot. | |||
[[File:Dome Construction 7.jpg | |||
Fill up the remaining spaces on the 6-way connectors with only A's and B's by making sure that a B-pipe is never next to another B-pipe. | |||
[[File:Dome Construction 8.jpg | |||
Join the ends of the new B's and C's with 4-way connectors, and A's and A's with 4-way connectors, forming 5 AAB and 10 BCC trinalges. | |||
[[File:Dome Construction 9.jpg | |||
Join the remaining spaces up, connecting two BCC triangles with a B-pipe, and everything else with an A-pipe in an A-A-B pattern as you go around. Initially this will put a lot of stress on the freskly made joints, so on large scale make sure you have someone to help lift the dome with you as you complete. | |||
=Covering= | =Covering= | ||
I have prototyped a theoretical covering for the above structure consisting of hexagons and pentagons of 18cm side length. There seems to be enough slack with this ~20% extra space to allow for the centre dimpling of each polygon. On large scale this covering will need tying down somehow - I'd recommend constructing tiedowns on the triangular face joints. This ought to allow sufficient strengthening, and is possible to tie on if the above construction method is used, by constructing the whole thing underneath the covering. | I have prototyped a theoretical covering for the above structure consisting of hexagons and pentagons of 18cm side length. There seems to be enough slack with this ~20% extra space to allow for the centre dimpling of each polygon. On large scale this covering will need tying down somehow - I'd recommend constructing tiedowns on the triangular face joints. This ought to allow sufficient strengthening, and is possible to tie on if the above construction method is used, by constructing the whole thing underneath the covering. | ||
Revision as of 14:16, 19 April 2015
| Geodesic Dome for Idiopolis | |
|---|---|
| Participants | |
| Skills | Mechanics, Muscles, Pipe Cutting |
| Status | Active |
| Niche | Hardware |
| Purpose | Infrastructure |
| Tool | No |
| Location | |
| Cost | |
| Tool category | |
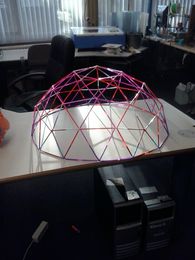
Dome Construction 9.jpg {{#if:No | [[Tool Owner::{{{ProjectParticipants}}} | }} {{#if:No | [[Tool Cost:: | }}
Construction of the pipe cleaner connectors
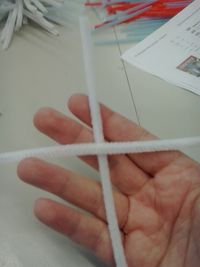 Start with two pipe cleaners, crossed in the middle.
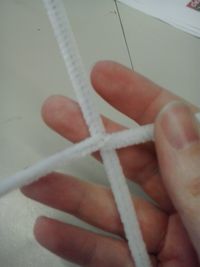 Fold them across each other. For a 4-way connector (blue hubs in the construction diagrams), do this again and stop here.
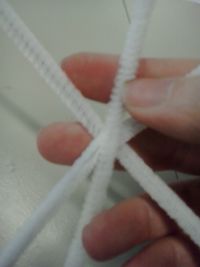 Add a third pipe cleaner across the fold to form a crude hexagonal arrangement. For a 5-way connector, offset the lengths so one is shorter than the others.
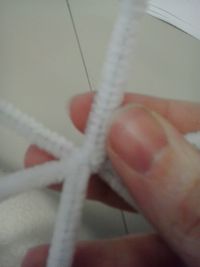 Counting from the top clockwise, fold the first(2 o'clock) and fifth(10 o'clock) spokes around the sixth (12 o'clock).
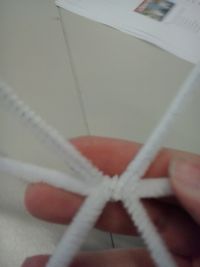 Do the same for the the second(4 o'clock) and fourth(7 o'clock) spokes around the fourth (6 o'clock).
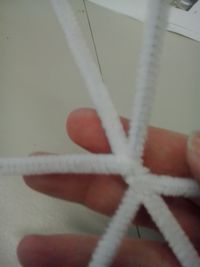 Rotate the entire structure clockwise by one spoke.
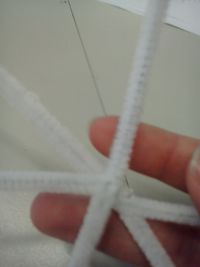 As above, fold the first(2 o'clock) and fifth(10 o'clock) spokes around the sixth (12 o'clock) in the opposite direction to before.
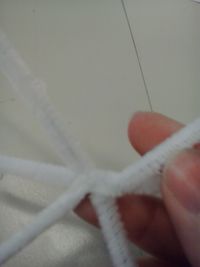 Finally, fold the second(4 o'clock) and fourth(7 o'clock) spokes around the fourth (6 o'clock) in reverse again to produce a 6-way connector (white hubs). For a 5-way connector (red hubs), loop the short end around the core and trim it short.
Strut construction
Cut: 50x 15.5cm tubes (A, purple in construction diagrams) 40x 15cm tubes (B, red) 30x 13cm tubes (C, blue)
Dome construction
-Things to remember:-
- The dome only consists of two types of triangle - AAB and BCC. If you ever construct any that don't match these, something has gone wrong.
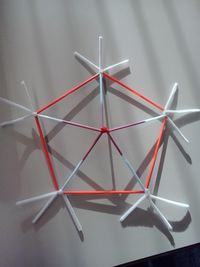 Start with a 5-way connector and put 5 C tubes around it. Tip these with 6-way connectors, and connect them with 5 B's to form five BCC triangles.
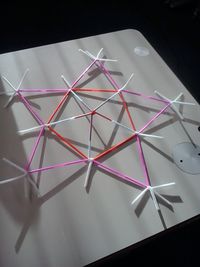 Add two A tubes to each of the outlying 6-ways leaving the last connection free. Connect these at the ends into five AAB triangles with more 6-way connectors.
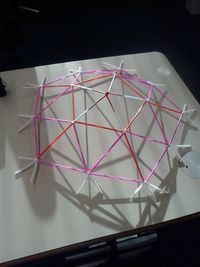 Fill up that last space with B tubes, and end those with 6-way connectors. Join all the outlying 6-way connectors up with more A tubes to make 10 more AAB triangles.
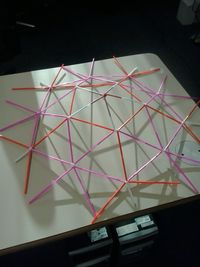 Any 6-way with just A pipes to it, add two more A pipes. Any others, put two B pipes around it leaving the centre free.
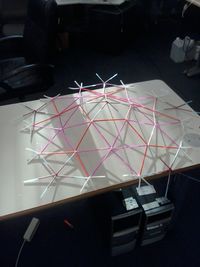 Make 5 more 5-way connectors with all the remaining C-tubes and put one joining to the remaining spaces where the B-tubes join. Then use more 6-way connectors to join up the next outer pair and form 10 more AAB and 10 BCC triangles.
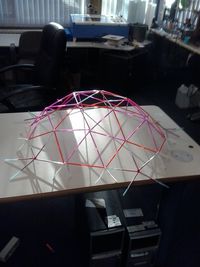 Connect the new 6-way connectors from above with a B-pipe. This will lift the dome a lot.
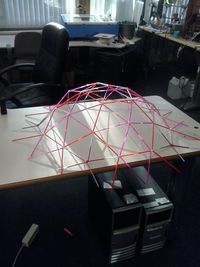 Fill up the remaining spaces on the 6-way connectors with only A's and B's by making sure that a B-pipe is never next to another B-pipe.
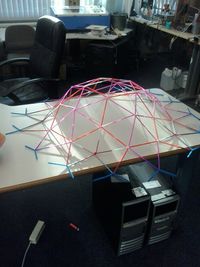 Join the ends of the new B's and C's with 4-way connectors, and A's and A's with 4-way connectors, forming 5 AAB and 10 BCC trinalges.
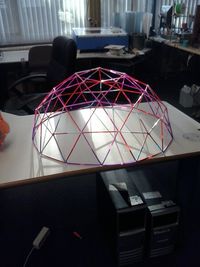 Join the remaining spaces up, connecting two BCC triangles with a B-pipe, and everything else with an A-pipe in an A-A-B pattern as you go around. Initially this will put a lot of stress on the freskly made joints, so on large scale make sure you have someone to help lift the dome with you as you complete.
Covering
I have prototyped a theoretical covering for the above structure consisting of hexagons and pentagons of 18cm side length. There seems to be enough slack with this ~20% extra space to allow for the centre dimpling of each polygon. On large scale this covering will need tying down somehow - I'd recommend constructing tiedowns on the triangular face joints. This ought to allow sufficient strengthening, and is possible to tie on if the above construction method is used, by constructing the whole thing underneath the covering.
