Manual PNP machine: Difference between revisions
Jump to navigation
Jump to search
(→Todo) |
(→Pics) |
||
| Line 42: | Line 42: | ||
Image:PNP_1.jpg|Base without gantry | Image:PNP_1.jpg|Base without gantry | ||
Image:PNP_2.jpg|The bearings for the X-axis | Image:PNP_2.jpg|The bearings for the X-axis | ||
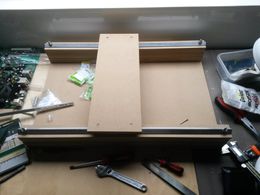
Image:PNP_3.jpg|Now with gantry | |||
Image:PNP_4.jpg|Y-axis added | |||
Image:PNP_5.jpg|Close-up of Y-axis bearings | |||
</gallery | </gallery | ||
Revision as of 18:39, 29 March 2015
| Manual PNP machine | |
|---|---|
| Participants | |
| Skills | Wood working, assembling |
| Status | Active |
| Niche | Electronics |
| Purpose | Use in other project |
| Tool | Yes |
| Location | |
| Cost | 100 |
| Tool category | Electronics |
PNP_3.jpg {{#if:Yes | [[Tool Owner::{{{ProjectParticipants}}} | }} {{#if:Yes | [[Tool Cost::100 | }}
Overview
In order to buils some other stuff, like the NURDled and the CC2850 zigbee modules, we need a more ergonomic method to populate the boards rather than manually populate them with a pair of tweasers. So I'm building a crude, but handy manual PNP machine
Stuff needed
WoodUSB Microscope- Tubing
- Footswitch
AirpumpPickup toolBearingsMisc
Todo
- Get tubing
- Convert airpump to vacuumpump
Assemble X-axis- Assemble Y-axis
- Assemble Z-axis
- Mount USB microscope
- Assemble vaccuum assembly
- Nurdify
Pics
<gallery> Image:PNP_1.jpg|Base without gantry Image:PNP_2.jpg|The bearings for the X-axis Image:PNP_3.jpg|Now with gantry Image:PNP_4.jpg|Y-axis added Image:PNP_5.jpg|Close-up of Y-axis bearings </gallery
