Reflow oven: Difference between revisions
mNo edit summary |
|||
| Line 1: | Line 1: | ||
{{Project | {{Project | ||
|Name=Reflow oven | |||
|ProjectSkills=Soldering, assembling | |ProjectSkills=Soldering, assembling | ||
|ProjectStatus=Active | |ProjectStatus=Active | ||
|ProjectNiche=Electronics | |ProjectNiche=Electronics | ||
|ProjectPurpose=Use in other project | |ProjectPurpose=Use in other project | ||
|Picture=reflowoven.jpg | |||
}} | }} | ||
[[File:reflowoven.jpg|200px|Thumb]] | [[File:reflowoven.jpg|200px|Thumb]] | ||
Revision as of 21:01, 21 August 2014
| Reflow oven | |
|---|---|
| Participants | |
| Skills | |
| Status | |
| Niche | |
| Purpose | |
| Tool | |
| Location | |
| Cost | |
| Tool category | |
reflowoven.jpg {{#if:{{{Tool}}} | [[Tool Owner::{{{ProjectParticipants}}} | }} {{#if:{{{Tool}}} | [[Tool Cost::{{{Cost}}} | }}
Description
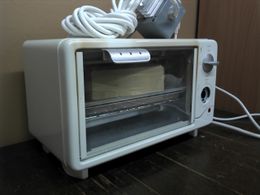
In order to assemble our own SMD boards, we need something to solder SMD. What is commonly used is a technique called reflowing. With reflowing, solder paste is applied to the to be soldered pads, the devices are mounted and the board is placed inside an oven.
The general idea is to heat the board up to a point where the solder paste liquifies, and forms a metallurgical bond between the pads and the pins of the devices. When the oven reaches 250 degrees, the oven shuts off and the solder becomes solid again, fixating the devices to the board.
The reflow process goes through a heating profile that consists of 4 stages.
- Pre-heat until 150 deg/c. The oven warms up
- Soak until 200 deg/c. The heat is allowed time to soak into the board and the devices.
- Reflow until 250 deg/c. In this stage the solder melts and does what it needs to do to make a bond.
- Cooldown. At 250 deg/c the reflow process stops and the board is allowed to cool down. At a certain point the solder becomes solid and the process is complete.
How to use
- Make sure the tip of the probe is lodged within one of the holes of the supplied Protoboard. The reason for this is that it'll measure the temperature of the copper rather than the temperature of the air.
- Hook the device up to the power supply.
- Turn it on by pressing the button left of the screen.
- Open door
- Place your object into to the oven.
- Place probe next to oven
- Close door
- Start reflow process by pressing one of the bottom buttons (not sure which one of two)
Parts
- Tiny oven
- K-type thermocouple
- Arduino UNO
- Reflow controller shield [1]
- Header pins
- Solid State Relais (SSR)
TODO
Order partsAssemble SSRSolder headers to reflow shieldAssemble controllerTest. Works!- Design case for controller
- Print case
- Create manual
- Design proper probe
- Build proper probe

