Network/Services/DoorLock
Summary
Our current access control system was not all that flexible, and we want to switch to a new system.
Architecture
Door scanner
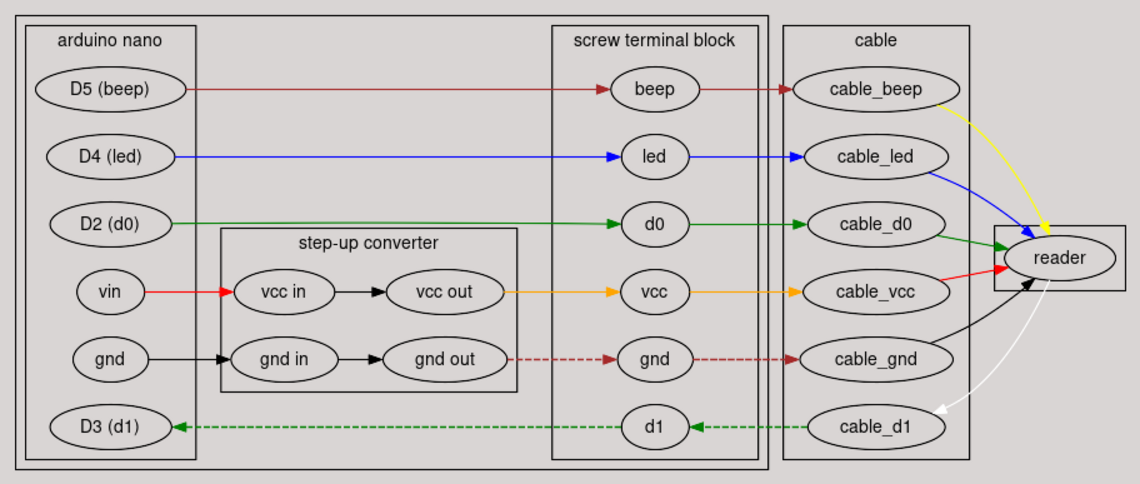
We have an Asia-Teco scanner speaks the wiegand protocol (details can be found here: https://a.aliexpress.com/_EJOtZhl). It has the following pinout on the cable:
| VCC (+12V) | Red |
| GND | Black |
| D0/RX/4R+ | Green |
| D1/TX/4R- | White |
| LED | Blue |
| BEEP | Yellow |
| WG26/WG34 | Gray |
An arduino combined with a stepup converter is used to translate the wiegand protocol to a text-based format which is exposed over usb-serial. The code for this can be found here: https://github.com/NURDspace/spacenanny-wiegand-arduino. This is linked together according to the following schematic, using a long piece of cat5 as the cable:
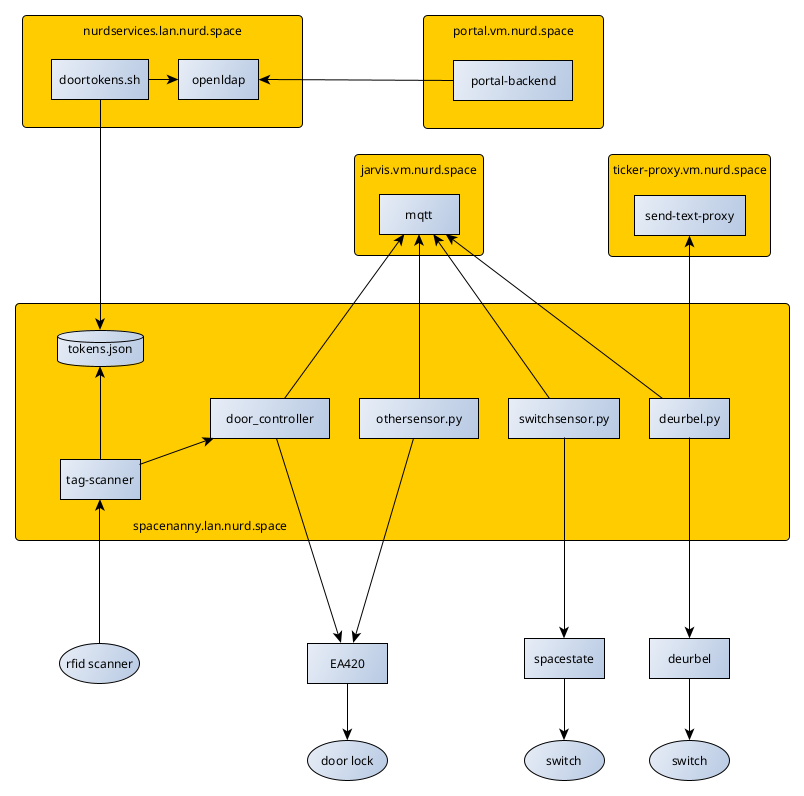
This arduino is connected using USB to spacenanny, and we run the tag scanner software there (https://gitea.vm.nurd.space/NURDspace/tag-scanner).
Tag Scanner
To read out the scanner, we use the tag-scanner software [1]. Once started, it will connect to the serial port on which the scanner is connected and wait for the scanner to send tokens. On reception of a valid token, the token is combined with a seed, and hashed using SHA256. The hashed token is used to perform a lookup in tokens.json, which contains a mapping of token -> username. If a valid match is found, a HTTP call will be made to the door lock api to disengage the door lock. If there is no valid match, a warning will be logged and a message will be posted on mqtt.
For testing purposes, the tag-scanner has a mock class to use in place of the physical tag scanner. This will automaticallty be used if there is no usb serial device available. It will present itself as a prompt which can be used to enter a token. The following is an example of running the tag-scanner in development mode, authenticating both a valid and an invalid token:
alita [tag-scanner] >> ./tag_scanner.py
INFO: Connected to localhost:1883
INFO: Scanner not found, running with a mock scanner
>> s 111234
INFO: Authorized access request for r3boot, disengaging door lock
INFO: Door lock has been engaged
>> s 111235
WARNING: Unknown token scanned: 69747dfa5ace63e857f16a73c268ce37b668a522eb6209a8b4478f3226a5d74e
>>
Furthermore, the tag-scanner will report auditing events via mqtt. The topic on which the messages is posted is '/door/access'. First, there are two messages used to signal the starting+stopping of the application:
{"host": "alita", "application": "tag-scanner", "level": "INFO", "subject": "application", "event": "starting", "timestamp": "1705766869.1188245"}
{"host": "alita", "application": "tag-scanner", "level": "INFO", "subject": "application", "event": "stopping", "timestamp": "1705766870.3937583"}
When a token is found to be valid, the following message is sent:
{"host": "alita", "application": "tag-scanner", "level": "INFO", "username": "r3boot", "event": "authorized", "timestamp": "1705767030.312545"}
When an unknown token is scanned, the following message is sent. Note that the token value is salted+hashed.
{"host": "alita", "application": "tag-scanner", "level": "INFO", "token": "69747dfa5ace63e857f16a73c268ce37b668a522eb6209a8b4478f3226a5d74e", "event": "unknown_token", "timestamp": "1705767085.1585684"}
For more information about tag-scanner, please see the README.md file in the tag-scanner repository.
Door controller
To control the EAN420 lock, we use a rest api which triggers the correct pins on the gpio ports of spacenanny. The code for this api can be found here. The rest api is secured with mutual-tls certificates based on a PKI infrastructure which is dedicated for the lock system. Access will only be granted if the api is presented with a valid certificate with an allowed Subject.
The api itself consists of three different parts globally. The Lock classes provide access to setup, status, open and close functionality for the lock. These classes will detect if the code is running on a raspberry pi. If this is not the case, a mock class will be loaded which simulates the working of the lock. This allows development of the software without access to physical hardware.
On top of the Lock classes is a Server class. This provides a flask-based api with built-in TLS support. Once a client connects, the validity of the presented certificate is checked, and a check is performed to determine if the Subject of the certificate is allowed to submit requests. Once the client is authenticated, it can call the `/v1/doorlock` using the GET and PUT methods.
If you call `GET /v1/doorlock`, the system will fetch the current state of the lock and return this as json:
{"locked": true}
If you call `PUT /v1/doorlock`, the lock will be disengaged for a configurable amount of time, after which the door lock is re-engaged. This is a blocking call, and it will return a blob of json containing the status of the operation:
{"status": true}
You can also do a GET request on the root of the api. This will return a piece of json with an overview how the API works:
{
    "endpoints": {
        "/v1/doorlock": {
            "GET": {
                "name": "status",
                "description": "Fetch the current lock status of the door"
            },
            "PUT": {
                "name": "unlock",
                "description": "Run the unlock procedure"
            }
        }
     }
}
Generating certificates for a new client is done using the `./scripts/gen_certificates.sh` script. The first time this script runs, it will automatically create the required CA certificates. You need to provide one required parameter, the Common Name for the new certificate. The CN is used by the api for authentication, and you also must add this CN to its configuration file.
alita [door_controller] >> ./scripts/gen_certificate.sh test
[+] Generating key and csr with subject /C=NL/ST=Gelderland/L=Wageningen/O=NURDspace/OU=Spacenanny/CN=test
.......+.........+...................+...+............+..+..........+.....+......+..........+........++++++
-----
[+] Signing csr with ca subject /C=NL/ST=Gelderland/L=Wageningen/O=NURDspace/OU=Spacenanny/CN=ca
Certificate request self-signature ok
subject=C = NL, ST = Gelderland, L = Wageningen, O = NURDspace, OU = Spacenanny, CN = test
You can also add a DNS-SAN as a paramter to bind the certificate to a certain host.
alita [door_controller] >> ./scripts/gen_certificate.sh test alita.local
[+] Generating key and csr with subject /C=NL/ST=Gelderland/L=Wageningen/O=NURDspace/OU=Spacenanny/CN=test
...+.........+........+..........+.........+...+...+.................+.+......+......++++++
-----
[+] Signing csr with ca subject /C=NL/ST=Gelderland/L=Wageningen/O=NURDspace/OU=Spacenanny/CN=ca and SAN DNS:alita.local
Certificate request self-signature ok
subject=C = NL, ST = Gelderland, L = Wageningen, O = NURDspace, OU = Spacenanny, CN = test
Finally, all operational actions performed by this api are logged via mqtt to the `/door/access` topic. Starting and stopping of the application submits the following events:
{"host": "alita", "application": "door_controller", "level": "INFO", "subject": "application", "event": "starting", "timestamp": "1705786235.4849396"}
{"host": "alita", "application": "door_controller", "level": "INFO", "subject": "application", "event": "stopping", "timestamp": "1705786250.7989783"}
When the lock is disengaged, the following event is logged:
{"host": "alita", "application": "door_controller", "level": "INFO", "subject": "lock", "event": "disengaged", "timestamp": "1705786238.1767676"}
After 5 seconds, the lock is reengaged, leading to the following event to be logged:
{"host": "alita", "application": "door_controller", "level": "INFO", "subject": "lock", "event": "engaged", "timestamp": "1705786243.1771927"}

