3D Printing Made Easy
| IMPORTANT: The content of this section is outdated. Please update this section if you can. If you have checked or updated this section and found the content to be suitable, please remove this notice. |
TL;DR
- On PrinterPC: Download STL for model, and slice with
S3DCura, its on the desktop. - Open the browser, connect to one of the printers, and upload your gcode
- Pre-heat both the bed and the head to the correct temperatures
- Press print
Introduction
Ever wanted to 3d print but dont have the knowledge to 3d print? Want to just print an object w/o having to be a electromechanical engineer? This guide is for you! To facilitate easy printing in our space, The Niz, Pokon and r3boot are working on a user-friendly setup in the print corner.
3D printing fundamentals
3D printing is the process of taking a digital object, and turning this into a physical object. The actual printer works using a heated nozzle, through which plastic is pushed (extruded), which melts in the process. The molten plastic is pushed through a tiny nozzle, which allows you to make very fine lines. This heated nozzle is mounted on a frame which allows the nozzle to move in the X, Y and Z directions, using stepper motors. This construction is hooked up to a microcontroller, which accepts gcode instructions. These gcode instructions tell the printer to perform a certain operation, eg: move the X axis by +10 steps, or extrude 5mm of plastic. This allows the 3d printer to 'draw' your object, layer by layer.
A 3d object is created using your favourite 3d design software, eg: Fusion360, Freecad, OpenSCAD, SolidWorks, Tinkercad, Blender. To use this object with 3d printers, it must be saved (or converted) to the STL file format. Since 3d printers only understand gcode, you need to use a so-called slicer to convert your STL into gcode. The slicer takes the STL, which consists of 3d vectors, and converts this to a program which will actually draw the object, line-by-line, layer-by-layer, using gcode.
The resulting gcode file can be uploaded to the printer using a FAT formatted SD card, or by uploading the file using OctoPrint, if the printer has this configured.
Our Setup
Globally speaking, our 3d printer setup consists of a bunch of printers which all have their own raspberry pi 3b+ attached running octoprint. Furthermore, a dedicated PC has been configured in the printer corner for usage with the octoprint instances (however, you are free to directly use octoprint from your laptop as well).
PrinterPC
A PC running ubuntu has been configured for dedicated usage with the printers. This PC can be found in the print corner, and you can login to that machine using the well-known wifi password. This machine has a copy of Simplify3D, an easy-to-use and capable slicer, which is pre-configured with profiles for all printers (but see TODO). a very old and proprietary slicer, PLEASE USE CURA.
Simplify3D
PLEASE DO NOT USE
Slicing a model with S3D is is a simple 3-step process. Start off by importing a new model:
Next, select the profile corresponding to the printer you want to use, and press the print button:
![]()
Cura is on the desktop and has actually current profiles and updates. S3D does NOT and gets no updates EVER.
Printing
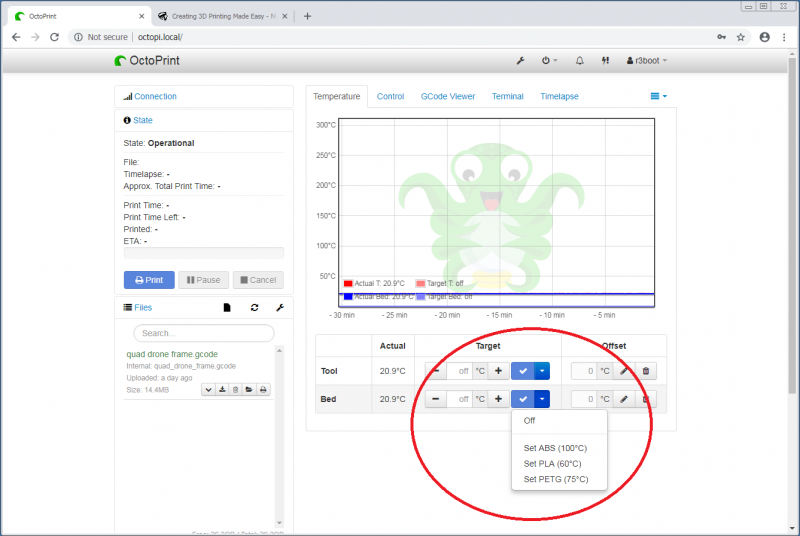
Once you have a file containing gcode, you can start your print. To control a printer, connect to it's octoprint instance via your webbrowser. Start off by pre-heating the head and the bed by selecting the temperatures corresponding to the material you are printing:
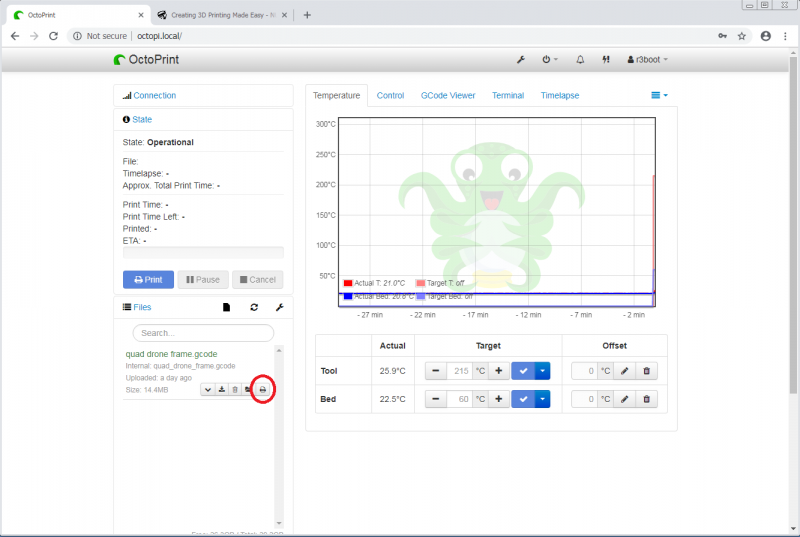
Next, upload your gcode using the 'import' button, and press the print icon:
And now .. you wait, until your print is done :)
3d printer urls
You can directly connect to the 3d printers using the urls below:
| Anet A8 | http://printer2.local |
| Creality Ender 3 | http://printer3.local |
Cost of printing
Right now, there is no process for managing the cost of the filament. If there is plastic, you can print, else you will have to bring your own. If you print on a regular basis, it would be appreciated if you also sponsor 1/more spools of filament.
TODO
- Add machines to DNS
- Add Anet A8 profile to S3D
- Add paragraph wrt bed levelling
- Add paragraph wrt proper object placement for slicing
- Add links to 3d printer pages

