9 Screen Wall 1
| 9 Screen Wall | |
|---|---|
| Participants | User:petraea |
| Skills | Linux, X, Ubuntu |
| Status | Dead |
| Niche | Video artsy stuff |
| Purpose | Fun |
| Tool | No |
| Location | Space |
| Cost | Negligible |
| Tool category | |
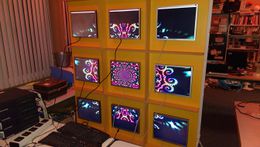
IMG_20141213_023306.jpg {{#if:No | [[Tool Owner::{{{ProjectParticipants}}} | }} {{#if:No | [[Tool Cost::Negligible | }}
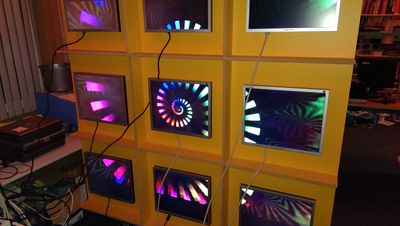
At the space we have received a large ex-promotional panel containing 9 Samsung 1280x1024 screens in a 3x3 formation.
These screens originally came with 9 small single-board VGA controllers with CompactFlash cards containing the images that were to be displayed on the monitors. A very simple setup, but not very flexible, and no network at all. Thus, these screens need driving with machines.
Machines
We picked up a car load of old, but fully functional machines, and thankfully from these it was possible to select a small collection with dual outputs to drive the monitors. 4x Compaq dc7600's came with VGA and DVI connections able to drive 8 screens, and 1 Dell Optiplex drives the last, in the following pattern:
----------------------------
|    dc7600       |        |
|         2       | dc7600 |
|                 |   3    |
------------------|        |
|        |        |        |
| dc7600 |optiplex|        |
|   1    |        |        |
|        |------------------
|        |    dc7600       |
|        |        4        |
|        |                 |
----------------------------
Installation
Using PXEboot all machines were installed with a stock 14.04.1 Ubuntu server install with OpenSSH. No desktop was installed at this point.
As the optiplex machine is to be used as the head with the dc7600's as the worker nodes, a key was generated for the main username on the optiplex and the pubkey put into .ssh/authorized_keys on all other machines.
- The SSHDconfig should be setup to disallow password logins.
All machines were apt-get installed with lubuntu-desktop, and thus defaultly start with lightdm. Each lightdm session was configured using the following script to allow tcp connections and automatically log in the main user on startup:
user@worker1:~$ vim /etc/lightdm/lightdm.conf.d/12-autologin.conf
[SeatDefaults]
autologin-user=user
xserver-allow-tcp=true
At this point arandr, xdmx and xdmx-tools should be installed.
- Here something should be done to disable screensavers to prevent lightdm locking locally - this prevents XdmX being able to connect to the remote X sessions.
xrandr
To get the workers to accept all the same resolution (which wasn't defaultly picked up by X on all systems), a custom xrandr script was created for each machine. Most of the machines had the same bindings for the VGA and DVI ports, but not all, so a careful reading of xrandr's output is required to debug.
user@worker1:~$ vim .screenlayout/layout.sh
#!/bin/sh
xrandr --newmode "1280x1024" 108.88 1280 1360 1496 1712 1024 1025 1028 1060 -Hsync +Vsync
xrandr --addmode VGA-1 "1280x1024" #Could be VGA0 - check xrandr
xrandr --addmode DVI-I-1 "1280x1024" #Could be DVI0 - chrck xrandr
xrandr --output VGA-1 --mode "1280x1024" --pos 0x1024 --rotate normal --output DVI-I-1 --mode "1280x1024" --pos 0x0 --rotate normal
#The pos changes per worker as to form rectangles as the ascii art above.
xauth and xhost
At this point we now have 5 machines that operate individually. In order to allow connection from optiplex to the dc7600's, we need to pull some strings. Remote X commands (sent default over TCP port 6000) can be sent the remote desktops (by setting the environment variable export DISPLAY=$machine:0, but will not be authorised without a) allowing the connection to be received from the master optiplex and b) having a copy of the MIT magic cookie to authenticate to. So in order to do this, the following steps need to be carried out on the remote machine:
user@master:~$ vim get-cookies.sh
for i in {1..4}
do
ssh worker$i -C "DISPLAY=:0 xhost +master"
key=`ssh dc7600-$i -C "xauth list worker$i/unix:0" | awk '{print $3}'`
xauth add worker$i:0 . $key
done
Be aware that this needs to be done on each instance of X, even after reboots! So this has to be performed each time remote connections want to be made from optiplex to the worker nodes.
Additionally, if X gets badly confused it might lock up or copy the .Xauthority file when the machine starts. So, in order to hack around this, the following line was put into rc.local on all machines:
user@master:~$ vim /etc/rc.local
rm -f /home/user/.Xauth*
At this point, you should be able to ssh into the remote machines from the head node, export DISPLAY=:0, and then start X programs such as xterm.
XdmX
XdmX is a remote distributed desktop that runs across multiple machines using remote X over TCP. By being able to remotely start X programs, an extended desktop session can be built over multiple machines. Thanks to this youtube video I got a hint about how to get XdmX to work:
sudo startx `which blackbox` -- /usr/bin/Xdmx :1 +xinerama -display :0 -display worker1:0 -display worker2:0 -display worker3:0 \
-display worker4:0 -input :0 -norender -ignorebadfontpaths -noglxproxy
In stages, lets break down this command. startx is used to start a new X session, in this case using blackbox, a lightweight window manager. The -- defines the beginning of the server options, here using XdmX to create a new display called :1. We can then list off the source displays as the list of -display <screen> entries, and then tell XdmX where to take its input from, i.e. this local screen, :0. The remaining flags are for compatiblity - ignorebadfontpaths simply makes sure XdmX will keep running even if its asked for nonexistent fonts, and the other two make it crash less.
If at this point XdmX doesn't seem to work, check the following things:
- Do you have write access to the head .Xauthority file? (If not, reboot. Failed (or even completed) XdmX likes to lock .Xauthority up.)
- Is the remote Display Manager starting X listening to TCP (i.e. open port 6000, try tcpdumping to see if you can see connection data)
- Do you have all the remote cookies correctly installed in the local .Xauthority file?
- Are all remote X sessions logged in and accessible? (ANY locking mechanism e.g. screensavers will prevent XdmX from being able to capture the remote X sessions. NOTE this will also cause the XdmX session to crash if the screensavers trigger whilst XdmX is running)
This will make a set of connected displays, but they are out of order and all over the place. We can up the ante by using XdmX's config file format to define the sizes and locations of all the displays. This format is not properly explained in XdmX's documentation, but in xdmx-tools is a program. xdmxconfig, which purports to be able to create compatible config files for XdmX.
My experience running this program is mixed. In order to create a new setup, you need to define a New Global with the name and total size of the config you want to have (here 'layout'), and then define New Screens with the right dimensions for each display (as full paths like the above display settings e.g. worker1:0, :0, etc.). Here you need to define the size of the screens and their offsets, bearing in mind that xrandr will make display :0 on each remote machine the size of both monitors combined (i.e. a rectangle).
xdmxconfig will give you a nice overview of where the screens will be and how they will fit together, however be aware this program is clunky and keen to crash, especially when closing windows down. It also output a config file similar to, but not exactly right, using the / delimiter (for something called a root window?) in an inappropriate place. I removed this in order to make the config work. Following is the final config file that works for XdmX, and the string used to call it:
user@master:~$ vim xdmxlayout
virtual layout 3840x3072 {
    display :0 1280x1024 @1280x1024;
    display worker1:0 1280x2048 @0x1024;
    display worker2:0 2560x1024 @0x0;
    display worker-3:0 1280x2048 @2560x0;
    display worker-4:0 2560x1024 @1280x2048;
}
sudo startx `which blackbox` -- /usr/bin/Xdmx :1 +xinerama -input :0 -configfile xdmxlayout -config layout -norender -ignorebadfontpaths \
-noglxproxy
At this point, you should now have a large, distributed display spread across all machines.
Several things to improve on this setup:
- Replace LXDE with something even smaller to reduce local overhead
- Improve networking interconnectivity
- Consider upgrading/replacing bits of hardware to improve render speed
Original controllers
- Grandtec Grand EYEZUP 4
- Grandtec Grand IP Media Player

