ESPHome on SHA2017 Badge: Difference between revisions
(Created page with "{{Project |Name=ESPHome on SHA2017 Badge |Skills=ESP32, |Status=In progress |Niche=Other |Purpose=Use for infra |Tool=No }} = What = The [https://wiki.sha2017.org/w/Projects:...") |
No edit summary |
||
| (10 intermediate revisions by the same user not shown) | |||
| Line 5: | Line 5: | ||
|Niche=Other | |Niche=Other | ||
|Purpose=Use for infra | |Purpose=Use for infra | ||
|Picture=SHABadgeESPHome1.jpg | |||
|Tool=No | |Tool=No | ||
}} | }} | ||
= What = | = What = | ||
The [https://wiki.sha2017.org/w/Projects:Badge SHA2017 Badge] is an awesome piece of hardware based on a ESP32 and an e-ink screen. It can run Micropython and a ton of apps for that are available @ [https://badge.team/ the Hatchery]. While I was thinking about writing an app for controlling Home Assistant, I realized that [https://esphome.io/ ESPHome] would be very suited for that. So here are some pointers to running ESPHome on the SHA2017 Badge. | The [https://wiki.sha2017.org/w/Projects:Badge SHA2017 Badge] is an awesome piece of hardware based on a ESP32 and an e-ink screen. It can run Micropython and a ton of apps for that are available @ [https://hatchery.badge.team/ the Hatchery]. While I was thinking about writing an app for controlling Home Assistant, I realized that [https://esphome.io/ ESPHome] would be very suited for that. So here are some pointers to running ESPHome on the SHA2017 Badge. | ||
= How to install = | = How to install = | ||
I am assuming some familiarity with ESPHome at this point. If not, check the guides on the ESPHome site: https://esphome.io/guides/getting_started_command_line.html or https://esphome.io/guides/getting_started_hassio.html | I am assuming some familiarity with ESPHome at this point. If not, check the guides on the ESPHome site: https://esphome.io/guides/getting_started_command_line.html or https://esphome.io/guides/getting_started_hassio.html | ||
* | * Create a yaml config file suited for your needs (a working base can be found [https://gist.github.com/Nizzle/6971c2cc066e6412740487bcc3b2c62a/ here]). | ||
* | * Run <pre>esphome run yourconfig.yaml</pre> | ||
If you enabled wifi and OTA and everything went well, you can program it wirelessly next time. | |||
It shoud compile and upload your firmware to the badge over USB. If you enabled wifi and OTA and everything went well, you can program it wirelessly next time. | |||
= Stuff that is working = | = Stuff that is working = | ||
* Touch pads (through [https://esphome.io/components/binary_sensor/mpr121.html MPR121]) | * Touch pads (through [https://esphome.io/components/binary_sensor/mpr121.html MPR121]) | ||
* USB and battery voltage readings (not verified but they seem sane) | * USB and battery voltage readings (not verified but they seem sane) | ||
* Button marked ''flash'' on the back | * Button marked ''flash'' on the back | ||
* DKE Group DEPG0290B1 E-Ink screen (Full refresh only for now, uses [https://github.com/Nizzle/esphome/tree/dke2.9-epaper this] quick and dirty driver modification. I updated the [https://gist.github.com/Nizzle/6971c2cc066e6412740487bcc3b2c62a gist] with config for it.) | |||
= Todo = | = Todo = | ||
== DKE Group DEPG0290B1 E-Ink screen == | |||
I started modifying [https://esphome.io/components/display/waveshare_epaper.html Waveshare E-Paper Display Component], it can do full refresh now. I would like to also implement partial refresh and make a pull request for ESPHome. | |||
== RGB(W) LEDs == | |||
This proved harder than expected. | |||
* We need to enable a pin on the MPR121 to power the LEDs, no easy way to do this through [https://esphome.io/components/binary_sensor/mpr121.html MPR121]. This component is only for the touch sensing, not the GPIO expander stuff. | |||
= Links = | = Links = | ||
* [https://raw.githubusercontent.com/SHA2017-badge/PCB/master/ | * [https://raw.githubusercontent.com/SHA2017-badge/PCB/master/sha2017_rev1_0_1_schematic.pdf schematics for the badge] | ||
* [https://docs.badge.team/badges/sha2017/hardware/ Badge.team hardware docs] | |||
Latest revision as of 16:56, 5 July 2023
| ESPHome on SHA2017 Badge | |
|---|---|
| Participants | Dennis |
| Skills | ESP32 |
| Status | In progress |
| Niche | Other |
| Purpose | Use for infra |
| Tool | No |
| Location | |
| Cost | |
| Tool category | |
SHABadgeESPHome1.jpg {{#if:No | [[Tool Owner::{{{ProjectParticipants}}} | }} {{#if:No | [[Tool Cost::{{{Cost}}} | }}
What
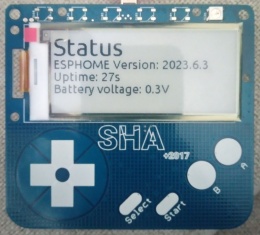
The SHA2017 Badge is an awesome piece of hardware based on a ESP32 and an e-ink screen. It can run Micropython and a ton of apps for that are available @ the Hatchery. While I was thinking about writing an app for controlling Home Assistant, I realized that ESPHome would be very suited for that. So here are some pointers to running ESPHome on the SHA2017 Badge.
How to install
I am assuming some familiarity with ESPHome at this point. If not, check the guides on the ESPHome site: https://esphome.io/guides/getting_started_command_line.html or https://esphome.io/guides/getting_started_hassio.html
- Create a yaml config file suited for your needs (a working base can be found here).
- Run
esphome run yourconfig.yaml
It shoud compile and upload your firmware to the badge over USB. If you enabled wifi and OTA and everything went well, you can program it wirelessly next time.
Stuff that is working
- Touch pads (through MPR121)
- USB and battery voltage readings (not verified but they seem sane)
- Button marked flash on the back
- DKE Group DEPG0290B1 E-Ink screen (Full refresh only for now, uses this quick and dirty driver modification. I updated the gist with config for it.)
Todo
DKE Group DEPG0290B1 E-Ink screen
I started modifying Waveshare E-Paper Display Component, it can do full refresh now. I would like to also implement partial refresh and make a pull request for ESPHome.
RGB(W) LEDs
This proved harder than expected.
- We need to enable a pin on the MPR121 to power the LEDs, no easy way to do this through MPR121. This component is only for the touch sensing, not the GPIO expander stuff.
