Wearable Computer: Difference between revisions
Jump to navigation
Jump to search
No edit summary |
No edit summary |
||
| (14 intermediate revisions by 2 users not shown) | |||
| Line 1: | Line 1: | ||
{{Project | {{Project | ||
| | |Name=Wearable Computer | ||
| | |Skills=Electronics, Mechanics, Optics, Linux | ||
| | |Status=Dormant | ||
| | |Niche=Other | ||
|Purpose=Fun | |||
|Picture=Wearable in orange.jpg | |||
}} | }} | ||
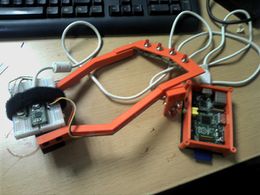
I want to build a wearable computer around a | I want to build a wearable computer around a Raspberry Pi and this 1cm wide CRT i salvaged from a camcorder. | ||
=== Pics === | === Pics === | ||
| Line 13: | Line 15: | ||
Image:Raspi_hmd_test.jpg|first tests of the screen | Image:Raspi_hmd_test.jpg|first tests of the screen | ||
Image:Spiffcorder-beta1.jpg|beta1 of the keyboard | Image:Spiffcorder-beta1.jpg|beta1 of the keyboard | ||
Image:Wearable-case-test2b.jpg|beta2b of the case | |||
</gallery> | </gallery> | ||
[http://gallery.nurdspace.nl/index.php?/category/5 moar pics] | [http://gallery.nurdspace.nl/index.php?/category/5 moar pics] | ||
=== Case === | |||
* Needs notching/interlocking connection from system to batterypack | |||
* [[File:Wearable-case-notch-Smidge204.jpeg|40px|This?]] Resuted in http://www.thingiverse.com/thing:26195 | |||
* Different 'units' | |||
* Raspberry + power unit is one unit, this has a display on one end, and only the needed connectors of the raspberry pi exposed. | |||
* Battery will connect to the main unit with the thingy linked above. | |||
* Possibility to hook up a second battery without disconnecting the first. | |||
* Possibility to connect two batteries together to make a bigger battery??? | |||
* Power Supply frontface; http://www.thingiverse.com/thing:26814 | |||
=== Battery system === | === Battery system === | ||
| Line 24: | Line 42: | ||
* will connect to the | * will connect to the main unit with a 3 pin connector (+v, 1-wire data, gnd) | ||
* there will be two 3 pin connectors to swap batteries while staying online (or maybe just run on two batteries) | * there will be two 3 pin connectors to swap batteries while staying online (or maybe just run on two batteries) | ||
* on | * on the Raspberry Pi there will be a attiny (or something) on uart0 to interface with the 1-wire | ||
* | * main unit will get an internal 2a 5v regulator (with display woohoo) | ||
| Line 42: | Line 60: | ||
=== Input === | === Input === | ||
( in 2012 this part was finished already; results on http://imgur.com/a/Sm1zr ) | |||
* https://github.com/buzztiaan/Teenspiffchord | |||
* a chording keyboard | * a chording keyboard | ||
Latest revision as of 21:25, 11 October 2015
| Wearable Computer | |
|---|---|
| Participants | User:buzz |
| Skills | Electronics, Mechanics, Optics, Linux |
| Status | Dormant |
| Niche | Other |
| Purpose | Fun |
| Tool | |
| Location | |
| Cost | |
| Tool category | |
Wearable in orange.jpg {{#if:{{{Tool}}} | [[Tool Owner::{{{ProjectParticipants}}} | }} {{#if:{{{Tool}}} | [[Tool Cost::{{{Cost}}} | }}
I want to build a wearable computer around a Raspberry Pi and this 1cm wide CRT i salvaged from a camcorder.
Pics
Case
- Needs notching/interlocking connection from system to batterypack
 Resuted in http://www.thingiverse.com/thing:26195
- Different 'units'
- Raspberry + power unit is one unit, this has a display on one end, and only the needed connectors of the raspberry pi exposed.
- Battery will connect to the main unit with the thingy linked above.
- Possibility to hook up a second battery without disconnecting the first.
- Possibility to connect two batteries together to make a bigger battery???
- Power Supply frontface; http://www.thingiverse.com/thing:26814
Battery system
- http://datasheets.maxim-ic.com/en/ds/DS2438.pdf for gauging and voltage monitoring
- http://www.ebay.nl/itm/1-PCM-Protection-Circuit-Module-For-11-1V-3S-Li-ion-Li-Polymer-Battery-pack-HX-/220967028845?pt=LH_DefaultDomain_0&hash=item3372a9486d#ht_1450wt_809 for protection of the unprotected cells
- will connect to the main unit with a 3 pin connector (+v, 1-wire data, gnd)
- there will be two 3 pin connectors to swap batteries while staying online (or maybe just run on two batteries)
- on the Raspberry Pi there will be a attiny (or something) on uart0 to interface with the 1-wire
- main unit will get an internal 2a 5v regulator (with display woohoo)
Screen
- crt will be mounted on cap
- beamsplitter will be mounted under the cap, reflecting visual into eye
- lenses will be needed between beamsplitter and crt for focus
- beamsplitter will be mounted on a swivel, and rotatable for higher flexibility
- another 3 pin connection : +5v, composite, gnd
Input
( in 2012 this part was finished already; results on http://imgur.com/a/Sm1zr )
- a chording keyboard
- http://www.thingiverse.com/thing:10541
- http://chorder.cs.vassar.edu/spiffchorder/forside
- http://pjrc.com/teensy/usb_keyboard.html
- https://github.com/robnormal/teensy-chorded-keyboard , omg , almost ready to use, change code to modified nasa from spiffchorder
- http://etc.servehttp.com/spiffchorder.pdf - 5 pages with all the chords in modified nasa
- keyboard nearly finished...
- add a mouse? maybe a trackpad on top of the wrist, or a mini joystick on the thumbpad?
Have
- Raspberry Pi
- mini CRT (second found, first seems dead now :s )
- teensy (for usb keyboard emulation)
- wrist frame (soon on thingiverse)
- Beamsplitter
(ordered)
(on the way)
- good power source
- needs a proper bms! gauging and maybe built-in charging?
- just needs 5V! but a lot of amps ...
Want
- magnifying lenses
- better case
- some wireless card(s) on usb ?


